Buying Crypto from the Uphold Exchange Part 2
- Mar 26, 2022
- 3 min read
Learning Objectives
Create a new Payee to buy XRP with my uphold account
Send £10 to uphold and use it buy ripple XRP
Use the Ripple network to send the XRP to my trezor wallet
Calculate the fees to buy XRP
Calculate the network fees to send XRP to the trezor
(We actually change to the Litecoin currency LTC as there is a technical hitch with the XRP Wallet)
Create new Payee
We learn't how to do this in the previous post, so I won't repeat the detailed instructions.
However, as a recap here is the screen that shows the reference number required to let Uphold know we want the exchange to convert our £10 to XRP.

Problem
I checked my Trezor and my first edition model one wallet doesn't support storing XRP, I need to have the latest Model T device.

Instead I am going to use the Litecoin network to demonstrate storing on the trezor.
Setup payee for Litecoin

Send £10 to uphold to buy Litecoin

Lets work out how much our £10 of litecoin is worth

Based on the screen above, our £10 of litecoin is worth £9.78
Withdraw Litecoin to Trezor
We need to find our Litecoin wallet deposit address, so uphold knows where to send it.

Click the Receive button to display the Litecoin wallet address
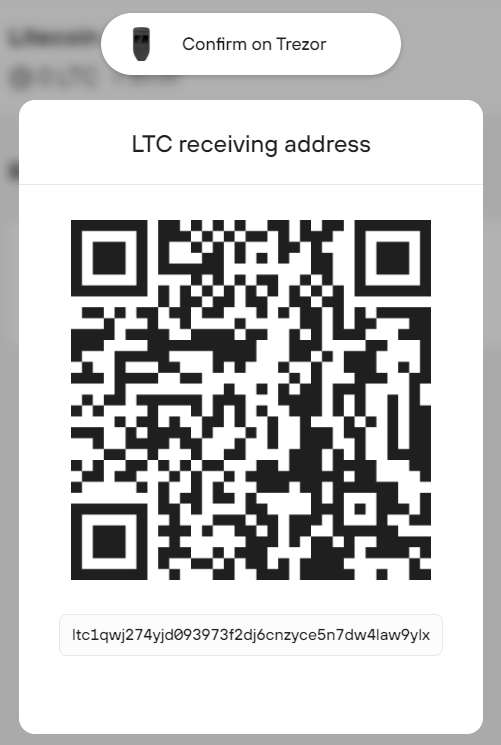
ltc1qwj274yjd093973f2dj6cnzyce5n7dw4law9ylx
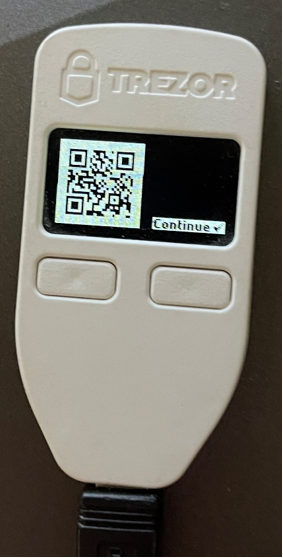
Check the wallet address is the same on the trezor

The wallet address on the trezor matches the address on web page, so we are confident it is the correct one to use.
The X QR Code button will display the wallet address as a QR code direct on the trezor display, you can use this to scan on another device to capture the wallet address from the QR code.
Withdrawing Litecoin from Uphold and sending to the trezor
We have the litecoin wallet address:
ltc1qwj274yjd093973f2dj6cnzyce5n7dw4law9ylx
Now we create a transaction on Upload to send Litecoin to the Litecoin network, this will calculate the fee. We can compare this to the fee the bitcoin network wanted to charge.

The fee to use the Litecoin network is 28p vs £9 to use the bitcoin network.
After Previewing the withdrawal and entering / scanning the litecoin wallet address, you will see the following screen to confirm the withdrawal

Press the confirm withdrawal button, if you want to go ahead with the transaction
For added security, you will be prompted to enter your 2 Factor authentication number

When the confirm button has been pressed the transaction will be processed, you can view the details from the activity log screen.

The current status of the transaction is processing, this means the litecoin is transit to your wallet. In reality it means the transaction is waiting to be picked by the miners who will try to solve the block.
After a while the block containing the transaction will be solved and the status will change to completed.

If we check our Litecoin wallet on the Trezor we will see the transaction has completed and we have litecoin in our wallet.

What have we learned
Firstly, we discovered that the Model One trezor doesn't support the XRP wallet, so I changed to the litecoin currency instead.
We created an additional payee with the bank, so funds that arrive get converted to Litecoin
Got the litecoin wallet address from the Trezor Suite and confirmed the address on the trezor device
Created a transaction on uphold to send the litecoin on the exchange to the trezor wallet.
Checked the network fee and make a decision to continue or not
Complete the 2 factor authentication security checks to process the transaction
View the litecoin on the trezor wallet
Next steps
We started off with £10, bought some litecoin and transfered it to the trezor for safe keeping.
Typically crypto stored in a hardware wallet is left there for long term storage, in this case we are going to move the litecoin back to the exchange to demonstrate how to do that.
Comments